Table Selfie Tabs
To make it easier to setup the TableSelfie Tablets a website where all options can be selected, iamges and videos uploaded and Photo layouts adjusted is available.
After setup on the website each individual TableSelfie can be synced with the website whereon it will download necessary videos and images and set the TableSelfie up automatically.
A username and password are required to access the website which will be setup for you prior to receipt of your equipment.
Log into the website using your username and password.

The first part we are going to look at is the HOMEPAGE, which is shown after logging in.

When Logged in the overall setup for your TableSelfie’s is displayed. We will go through each one to explain the function.
The first option is the TableSelfie Set. Each ‘set’ can have a different setup. So whilst at an event if you want half the room to have a particular on screen images, videos and photo layouts you can set up the ‘Blue’ Set, then the other half of the room can be setup under the ‘Green’ set.

Event Name – This is fairly self explanatory and allows you to keep an eye on what event you currently have allocated to this set.
If you have multplie events coming up then use the different sets to select the options.

Opener Video – Whilst in idle mode waiting to be used the TableSelfie’s can show a Video. Choose the video you wish to use Here. If you have a new video you can upload it through the UPLOADS Menu item at the top of the page.
Note: Be sure to tick ‘Use Video Opener’ to use the video option else a static image will be used.

Image Opener – If you prefer a static image then you choose one here. An advantage of a static image is the battery life is extended during an event.
Uploads for Images are through the ‘UPLOADS’ menu option at the top of the webpage.
Note: Be sure to un-tick ‘Use Video Opener’ to use this option.

Finished Image – After the process of taking the photo and printing/emailing or texting has completed there is an option to finish the cycle with an Image.
A ‘thank you’ note perhaps, or if it’s acorporate event, some sponsors names.
Choose the finished image here, uploads through the Menu item at the top and be sure to tick ‘Use Finish Graphic’ for this to take effect.

Background Image and Logo Image – Selectting the background image and logo image here allows you to adjust the Photo Layout through the IMAGE LAYOUT menu item.
You can upload new background Images or Logo’s through the UPLOADS menu item.
Twilio Setup – To save having to type the texting option into each Tablet you can setup the Twilio details here so it sync’s and updates with each tablet.
Note: You can have different Twilio setups for Different Sets if required.

Update Settings – Finally remember to click Update Settings at the bottom to store any changes you have made.

The next section of the website we will look at is the UPLOADS.

Depending on what you are uploading you need to select the correct option in the drop down menu.
Video File – These are for all videos playing on the Tablet
Image File – All static images used on the Tablet
Background File – Images used as the background of the taken Photo layout
Logo File – Any images used as an overlay, or logo, on the taken Photo.
Select the option then click Browse to find the image on your device.
After selection of the image some information will be shown about the selected file and a ‘Upload’ button will appear.
Click this starts the upload process.


Image Layouts – The final part of the TableSelfie Control Website is the Image Layouts.

Logo Position and Photo Position – Adjust the position of Your Logo and Photo’s using the arrows provided.
Scaling of hte Logo and Photo can be done via the slider bars.
The image is rendered after each click/change.

Save Layout – Finally click the Save Layout button in the right hand menu when your happy with your layout.

Text to Logo Menu Item.
This allows you to create any text into a logo to add to the TableSelfies. As the Tablets don’t have easily installable fonts this is a convenient way of adding in custom text.

Enter any text you would like to add to the TableSelfie in the Text Entry section.
Then Choose a Font, or if you have a specific font on your PC Enter the name of the font in the Installed Fonts text box. Note: If the font is incorrectly named the image may not be rendered.
Choose a Font Size and Font Colour then Click the Create Link to Render the Text.
Change any settings required to suit then after Creating again click the Save png to save the image in the Current Sets Logos.
Go to the HomePage and Logo’s drop down to see the additional Logo.

Video Covering Hardware Setup (Laptop, Server, Printer).
Click Above Link Description to view Video.
8 Minutes Length
TableSelfie Setup (turning On, build, battery)
Click Above Link Description to view Video.
2 Minutes Length
Tablet Software Setup (Tablet, Android, Website)
Click Above Link Description to view Video.
9 Minutes Length
TableSelfie Manual
Booting Up the System.
There are just 4 steps to using the Table Selfies’.
Step 1 – Plug in the Router and turn it on. Note: The Router can take 4 minutes to fully boot up.
Step 2 – Plug in the Laptop and turn it on, also connect a Ethernet Cable between the Laptop and Router.
Step 3 – Wait for Router and Laptop to fully boot up.
Step 4 – Turn on 1 or more of the Tablets.
Altering Settings on Individual Tablets
The main layout for your Tablets should be done through the TableSelfie Control website and sync’ed with the tablets for ease of use.
However there may become a time where you need to alter 1 or more tablets to change the settings.
Perhaps the Client has changed there mind and you don’t have internet access.
Below is the run through of altering the settings on the TableSelfie Tablets.
The opening page of the TableSelfie app shows you the currenty settings of that TableSelfie.
Clicking RETRIEVE SETTINGS will sync the details from the website and setup the Currently Selected Set (You can change the Set from the Top Right Option).
All the settings can also be changed here but they may then not be in sync with what you have configured on the Website.
SYNC PHOTOS – This option will allow the current events images that have been taken to be synced to a Laptop (if a laptop and print station has also been purchased). The files for the current event are sent to the laptop and put into a file in the Pictures folder within a file of the current date. So pressing this on each TableSelfie after an event will capture all images and put them in a folder on the laptop where it’s more convenient to copy them to a USB.

Further Options are available from the drop down menu shown very top right (highlighted in the picture to the right).
Click the three lines then select ‘Settings’.
Alternatively you can select ‘Restart App’ or ‘Shutdown App’.

The Settings page allows you to further fine tune your TableSelfie by turning on or off various options such as Print, Texting and Emailing.
You can also enter the twilio details in here if necessary (although we suggest using the website to sync them tablets as it’s easier).

When your ready to being all you need to do is click on the Circle with a Small Camera icon in top center of the main screen.

TableSelfie Laptop Usage
Items on this Page:
· – Booting up and Setting WiFi
· – Using the Laptop to Reprint/Email/Text Items
· – Configuring the Laptop’s Settings.
Booting Up and Setting WiFi
After booting up the laptop log in using the password.
You are presented with the Laptop Desktop which should look something like this:

There are two main parts of the desktop we are concerned with.
The first one is the Wifi Connection icon (shown circled by pink):
![]()
Click on this icon to get a list of WiFi Connections. Be patient as the WiFi listing can take upto 10 seconds to fully list all WiFi Connections.
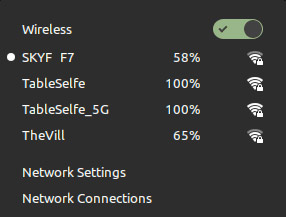
When the required WiFi is listed click on it and enter the Passpphrase for that WiFi Connection.
Note: The TableSelfie and TableSelfe_5G are used by the Tablets so don’t choose these.
Using the Laptop to Reprint/Email/Text Images
Firstly on the Desktop locate the browser icon and click on it to launch the browser:
![]()
After the browser appears, ignore any messages on the screen and located the Home Icon and Click it to make sure the browser is looking at the correct web page.
![]()
When clicked it should load up the TableSelfie Image Control Page.

To Reprint, Re-Email or Re-Text an image simply click on the desired image.
It will then present you with a page Where you can click to Reprint*.
Enter an Email Address to Email
Or enter a Mobile Number to Text**.
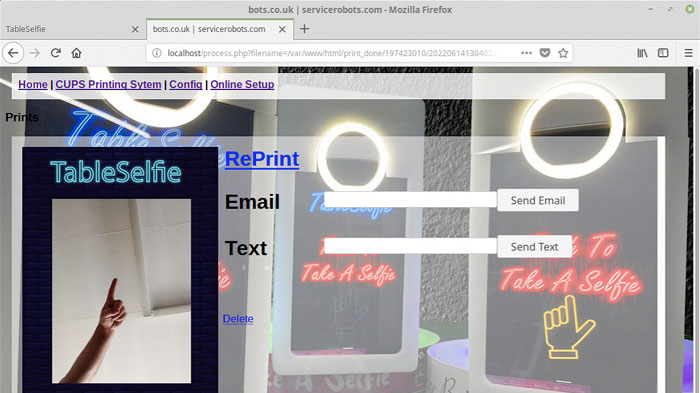
* Printing requires a Printer to be setup on the Linux System.
** Texting requires a Twilio account.
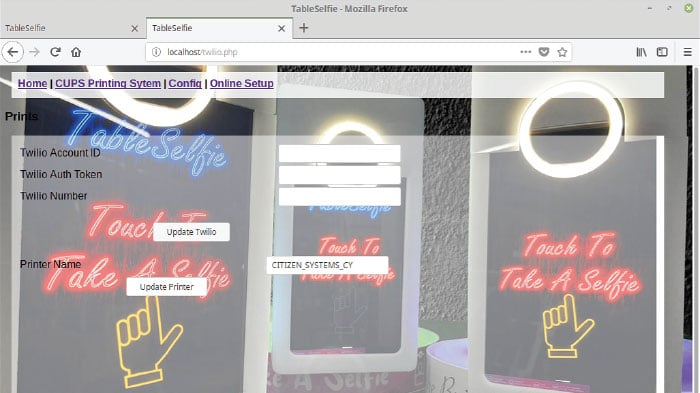
Configuring the Laptop’s Settings.
Click the Config option in the Menu to setup the Text Messaging and Printer Settings.
Enter into the various text boxes the required information.
1. Twilio Account ID
2. Twilio Authorisation Token
3. Twilio Mobile Number
All these settings can be found in the Twilio Account after login.
4. The Printer Name as Listed by Linux.
If you need any help with any of these please contact support for a booking time and we can help out.
TableSelfie Graphics and Video Formats
TableSelfie Still Images for Opener, Finish.
Dimensions: 480 × 820 pixels
Format: Jpeg
TableSelfie Photo Background
Dimensions: 1728 × 2592 pixels
Format: Jpeg
TableSelfie Logo Overlay
Dimensions: Can Vary but something around 1205 × 253 pixels
Format: PNG (As png files can have transparency).
Video Formats
Opener, Countdown, Finish Videos:
Dimensions: 480 x 820
Format: MP4
Software updates for the TableSelfies will be release preiodically.
To check the version of the software you are currenrly running you can check the bottom left of the screen after launching the TableSelfie App on the Device.
When update is available the URL for the APK Download and instructions will appear here.

Current Software Version: 2.9
Software Update Instructions
Step 1.
Make Sure your Tablet is connected to the internet then open a browser on your Tablet (this may be called Internet) and go to the web address shown above.

Step 2.
Download the App and if you want to see it’s progress swipe down from the top of the screen.


Step 3.
Go to the My Files App and select the ‘Downloads’ folder on the left hand side.
Next click on the ‘app-release.apk’ file to allow us to install.
At the bottom of the Screen there will be an ‘INSTALL’ icon, click this to start.


Step 4.
The Tablet protection may pop up a Blocked by play Protect warning.
Click on ‘INSTALL ANYWAY’ to continue with the installation.

Step 5. << Not always Necessary
If your tablet is new from the factory and this is the first update you have performed you may get an error that ‘App not installed’ due to a conflict.
If that is the case we just need to uninstall the current App to allow us to re-install.
Find the TableSelfie 2 App on the device and press and hold your finger down on it.
A menu should appear where you can select ‘Uninstall’. Click ‘OK’ to confirm uninstallation.
Next go back up to Step 3 to re-install.


Step 6.
Any questions asked by the Tablet about scanning just dismiss.
Next click on ‘open’ to start the App.
The First time it runs it may ask for some permissions, always select ALLOW.
NOTE: If you had to go through Step 5 to install please go to Step 7 to finish the setup.
If not your now ready to ‘RETRIEVE SETTINGS’ to get your tablet Synced.


Step 7.
If you have had to un-install the app the allow the update then we need to do one more thing before we can sync the settings.
Load the App and go to the Settings Options (top right three lines then select settings).
Just above where it says ‘Languages’ click down 7 times (you’ll notice a slight colour change in the panel when it’s done correctly).
Then just under the ‘Email’ option at the bottom press once.
If done correctly a digalogue box will appear with 111111111.
Delete this number and enter your own serial number, which can be found listed in the TableSelfie Control website on the right hand side at the bottom.
Click OK and return to the main options where you can now retireve your Tablets details.


 Been in or around engineering/manufacturing my entire life, grandparents who let you build cars with them have their uses!!
 After spending 4 years in Leicester studying physics where my final dissertation project was heavily programming based I was keen to begin a career in software development. Working on Photobooths seemed like a fun and interesting place to start.
 Born in Malta in January 1989, Maurizio has always dreamt of doing something impossible in his life. That’s exactly what he has done a few years ago when he decided to leave everything and moved to the West Midlands. His Passion was also another reason why he has chosen the West Midlands – West Bromwich Albion. Worked in different industries, like tourism, advertising, construction and entertainment, finance was always something that he wanted to do. Asking who Maurizio is to his friends, you would have one simple answer, – Joker, A Caring Person and a Plane Spotter.
 From College went into the family run business – Advertising Agency. Eventually took over the reins of the company and moved it into a more technical direction. After retirements changed the dynamic of the company we changed direction to a Direct Mailing Company specialising in digital and mailing’s for Electricity companies (MEB, British Gas, nPower). After a profitable run I felt a change was needed and so started a Programming and Consultancy Business. This eventually led me to the world of PhotoBooths and beyond.